Google Nest WiFi – Adding a second router

With the COVID-19 lockdown in place, I suddenly found myself working from home more than I’d ever done before, from the end of March 2020. I’d worked from home sporadically before, but doing so permanently highlighted some issues with my home WiFi setup. To cut a long story short, I decided to install a Google Nest WiFi setup, to make use of the mesh network functionality, to improve the WiFi coverage in the house.

As a secondary requirement, I wanted the WiFi to extend to the garage, as I’m spending a lot of time there at the moment (see my other blog for more info on that – https://theredmini.co.uk). I was hoping that installing a Google point in the garage would be sufficient and it would have a strong enough signal to pair with the router in the house, though I always suspected that wouldn’t work. I initially ordered a Google Nest Wifi bundle with one router and one point. I set the router up and tried the point in the garage, but the signal wasn’t strong enough for it to work properly. I resorted to plan B; to buy another router/point pack and install the router in the garage, running a network cable from the house to the garage. I could have just bought a router on its own, but I wanted the extra point for the house.

Up until this point, setup of the Google Nest WiFi system had been really straightforward, simply adding devices via the Google Home app. Adding the second router was a bit more troublesome. I’d read up before I bought anything, to make sure that a second router could be added as a slave to the master router in the house, as I figured I’d need to wire a connection to the garage and the Google Nest Wifi points have no wired connection, making another router my only option. I find this a bit annoying, as I’d prefer to use a point in the garage, as it also comes with the Google Assistant, which the router doesn’t have.

Here’s what I’d planned:

Home Network Planned

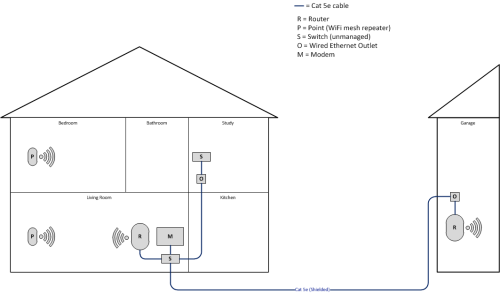
On my existing modem/router (a BT Smart Hub), I’d disabled WiFi. I had a wired connection from my BT Smart Hub to a 16-port Gigabit unmanaged switch. I also connected my Google Nest router to this switch. This was enough to get the Google Nest WiFi working, with the points attaching via a wireless mesh network to the Google Nest Router.

I ran a network cable from the house to the garage and connected it to the switch at the house end. At the garage end, I connected the cable up to the new Google Nest WiFi router. This is where my problems began, as when I tried to set up the new router via the Google Home app, I kept getting an error saying there was a “Problem connecting to cloud”.

IMG_1748

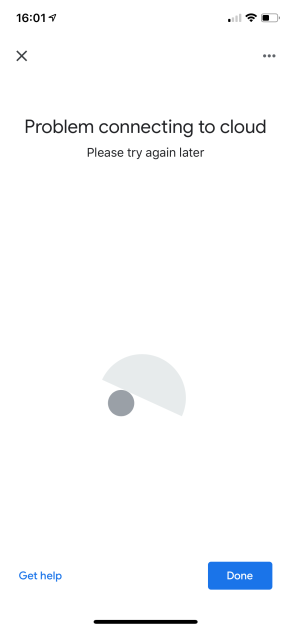
I thought I must have a cable connection issue, but after going through and validating all the cabling, I figured it must be an issue with having two routers on the same network. I knew this was supposed to work, so I started Googling for a solution. One thing I found on a Google forum indicated that there shouldn’t be any other devices between the primary and slave routers. As mine were connected via a switch, I tried connecting the primary router’s WAN port directly to the BT Smart Hub and the cable from the garage router directly into the LAN port of the primary router. I then tried setting up the secondary router and it worked just fine. The new setup looks like this:

Home Network Actual

So, the long and short of it is that if you want to add a secondary router, make sure it’s wired directly into the primary router and not via a switch.

One question that I’m left with is what if I wanted more than two routers? As each router only has one WAN and one LAN port, I guess the routers would have to be daisy-chained, so the second router connects to the first and the third connects to the second etc. In my scenario, where my second router is in the garage, that would be very inconvenient, though luckily I’m quite happy with my setup now and have no plans for a third router.

Along the way of trying to figure this out, I found out a few things on my router that could be useful, so I thought I’d share them.

Firstly, although the instructions that come with the Google Nest WiFi tell you to use the Google Home app to set it up, you can also download the Google WiFi app, which gives you a lot more information about your network and allows you to configure it in much more detail.

Secondly, the Google Nest WiFi does have an API, which although fairly rudimentary, can actually be used to glean some useful information about your network and its status.

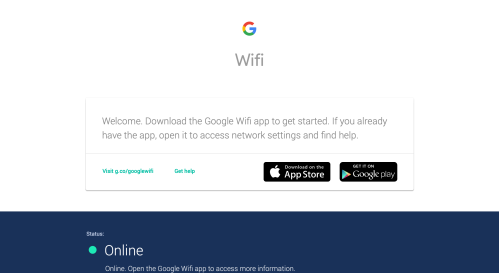
The Google Nest WiFi router has a default IP address on its LAN port of 192.168.86.1. It then assigns 192.168.86.20 to 192.168.86.250 as a DHCP pool for devices connected to the WiFi. If you try to access 192.168.86.1 via a web browser, you just get a page telling you to download the Google WiFi app, like this:

Google WiFi

However, you can access the API at 192.168.86.1/api/v1

There are a number of API interfaces, however most of them aren’t that useful. The two that I found very useful are status and diagnostics-report. For example to get the status, you’d browse to:

192.168.86.1/api/v1/status

For the diagnostics report:

192.168.86.1/api/v1/diagnostic-report

The status output is most useful for telling you about the status of the WAN link (the connection to your broadband router). There’s also a wan-configuration command, but in my case, all it outputs is “DHCP”. Not very useful. The status command output from my router looks like this:

{

“setupState”: “GWIFI_OOBE_COMPLETE”,

“software”: {

“blockingUpdate”: 1,

“softwareVersion”: “12371.71.11”,

“updateChannel”: “stable-channel”,

“updateNewVersion”: “0.0.0.0”,

“updateProgress”: 0.0,

“updateRequired”: false,

“updateStatus”: “idle”

},

“system”: {

“countryCode”: “gb”,

“groupRole”: “root”,

“hardwareId”: “MISTRAL D2C-A2A-A3R-I9R”,

“lan0Link”: true,

“modelId”: “MISTRAL”,

“uptime”: 264189

},

“vorlonInfo”: {

“migrationMode”: “voobed”

},

“wan”: {

“captivePortal”: false,

“ethernetLink”: true,

“gatewayIpAddress”: “192.168.1.254”,

“invalidCredentials”: false,

“ipAddress”: true,

“ipMethod”: “dhcp”,

“ipPrefixLength”: 24,

“leaseDurationSeconds”: 86400,

“localIpAddress”: “192.168.1.120”,

“nameServers”: [ “8.8.8.8”, “8.8.4.4”, “192.168.1.254” ],

“online”: true,

“pppoeDetected”: false

}

}

The first three sections aren’t that interesting, but the “wan” section at the bottom tells me that the WAN port is active (ethernetLink : true) and its IP address, along with the DHCP lease duration, the IP address of the gateway (in my case, my BT Smart Hub) and the configured DNS servers.

More useful still is the diagnostic-report interface. This gives quite a verbose output, which is downloaded as a text file rather than presented in the browser window. This file consists of some text at the top, with a large section of encoded data, then another text section at the bottom.

The text at the top has a couple of interesting, if not all that useful bits of info, including the OS version (it runs Chrome OS) and some memory utilisation stats.

The text at the bottom of the file is more useful. There, you’ll find all kinds of things, like the settings for the intensity of the LED, to the results of the last Internet speed test. The most useful bit, to my mind is the station_state_updates section. In here, you’ll find a station_state_update stanza for each of your connected devices. An example from my network is the device that I’m writing this on:

   station_state_update {

station_info {

station_id: “4023513E232F5AEEFE281E7E736ACEFCC5F6C900EB3ED0584652B2F3A16DCFF0”

mdns_name: “Neils-MacBook.local”

connected: true

ip_addresses: “192.168.86.42”

wireless: false

dhcp_hostname: “*************”

wireless_interface: NOT_APPLICABLE

taxonomy_ids: “0C41635CF7F17F33A75EACF1CF0B97D0D7566E2B5D59C965DC415791AAB99D91”

dns_sd_features {

key: “Neil\342\200\231s MacBook._device-info._tcp.local”

value: “model=MacBook9,1”

}

last_seen_seconds_since_epoch: 0

oui: “a8667f”

guest: false

os_version: “”

device_model: “”

os_build: “”

}

}

There’s all sorts of useful info in there, including the name of the device, it’s assigned IP address, the time it was last seen active on the network and interestingly, some fields for OS version information, which aren’t populated on any of my attached devices.

Below the station_state_updates section is all sorts of info about the DHCP pool, any DHCP reservations, DNS servers, Quality of Service (QoS) configuration, content filtering, WiFi radio info (including channel numbers), mesh network info and all kinds of other stuff. Most of it not that useful, but interesting to poke around.

One thing that does still bug me about the whole setup is that if you want a wired connection, your only option is the router, which doesn’t have Google Assistant capability. I would have preferred to use a point in the garage, rather than a router, so I’d have the Google Assistant available. It would be quite handy to simply ask a question and get an answer, rather than having to use my phone with mucky hands from working on the Mini! Unfortunately though, I’ve had to use a router in the garage, as that’s the only way to get a wired connection. I could, of course add a point in the garage, which would connect via mesh to the router, but we’re getting into expensive territory at that point.

I guess Google have to build these things to a price and adding a wired network port to the point would have increased the cost slightly. It would also have made the design more difficult, as a network port would have got in the way of the speaker on a point a little bit. I’d rather Google offered the option of a wireless only, or a wired point, even if it were a little more expensive, though I guess that would involve a whole lot more manufacturing and made the product line-up more complicated.

Still, I’m pretty happy with the setup I’ve got now, even if I’m still missing Google Assistant capability in the garage.

8 Comments

Filed under Uncategorized

Swann DVR8-5580 Noisy Fan Fix

I recently bought a Swann DVR8-5580 with four 4k cameras, to replace my ageing CCTV system, which had a pretty poor quality picture. I’ve been very happy with the new setup in most respects, however the DVR unit does have one very annoying feature – the fan. It’s just too noisy!

I have my DVR unit located in my living room, next to my broadband router and TV. This makes connecting it to the router really easy (you need to use a network cable, as it has no WiFi capability) and also the connection to the TV is simple (the DVR comes with a HDMI out and a VGA out), however being in the living room makes the noise from the DVR unit really annoying!

I had a bit of a Google around and found several other people reporting the same issue, but no real fixes. So, I’ve taken the matter into my own hands and thought I’d report my findings here to hopefully be of use to other owners of the same system.

The Problem

The issue with the DVR8-5580 is that it’s too noisy. To demonstrate how noisy, I used a free dB meter app on my phone, held next to the DVR unit to see how loud it was. Below is the result – 74.3dB. That doesn’t mean a lot on it’s own, but it gives me a benchmark to work against.

IMG_3263

The Fix

I wasn’t sure at first whether the noise was coming from the fan, or the hard disk. After listening to it for a while, it became fairly obvious it was the fan, as it was a constant noise, which didn’t change with disk activity. Removing the lid from the unit showed a fairly poorly designed interior, in terms of cooling, with a single fan, measuring 40 x 40 x 10mm. It was very apparent upon opening the lid that the fan was the source of the noise.

The original fan is made by Sunon and is a 12V 0.8W fan, with a 2-pin connector:

IMG_3309

After doing some research, it turns out that 40 x 40 x 10mm is a pretty commonly available fan size for PCs. It’s good to have options. Of all the available fans, the brand that consistently got good reviews was Noctua, so that’s what I went for. They’re available on Amazon for £11.11 at time of writing:

Aside from the new fan, you’ll need the following in order to replace the fan in your DVR:

  • A cross-head screwdriver
  • A drill
  • A 5mm HSS drill bit

IMG_3280

IMG_3281

The fan comes with a 3-pin connector, which won’t fit the 2-pin connector on the Swann DVR’s main PCB.

IMG_3282

The Noctua how does however come with a number of adapters in the box, one of which converts it to a 2-pin.

IMG_3283

IMG_3284

The third pin is a tachometer output from the fan, to tell the connected device how fast it’s spinning. The Swann DVR doesn’t use that, so it just needs the two power pins.

To fit the fan, you first need to remove the lid of the DVR unit. This is done by removing four cross-head screws towards the corners on the bottom of the unit and then lifting the plastic casing upwards. It will still be attached by some wires for the LEDs and USB ports on the front, so don’t yank it away.

With the lid removed, you’ll see something like this:

IMG_3277

The fan is that black rectangle bit in the middle.

You’ll notice that the fan is held in place by two screws at the base of the fan.

IMG_3287

This is where things start to get annoying. You can’t unscrew the screws, because the main PCB of the DVR is in the way. I tried using a right-angle screwdriver, but no luck – the fan is too close to the PCB to get the screwdriver in.

IMG_3293

The only way forward is to remove the entire main PCB, so here goes. From above, there are three screws holding the PCB in place. Remove those three screws, shown below.

IMG_3286

The board is additionally held in place by a number of screws on the rear face of the DVR. Remove each of the below screws, making a note of which type of screws came from where.

IMG_3289

IMG_3290

IMG_3294

You should now be almost able to remove the main PCB, however you won’t be able to move it back far enough for the BNC connectors to go through their holes, as the hard disk will be in the way. Remove that, by unscrewing the four screws from the bottom of the DVR unit and you should now be able to carefully pull away the PCB. You’ll end up with a pretty bare looking plate of metal with just the fan on it.

IMG_3295

Now you’ll have all the clearance you need to unscrew those two pesky screws at the base of the fan. Remove the fan and un-clip its connector from the main PCB. Throw it away, burn it, or whatever you think it deserves.

The screws for the Noctua fan are larger in diameter than the original fan’s. This is a problem, as they won’t go through the holes in the little metal flaps in the base unit that the fan screws onto.

IMG_3297

I bent the tabs back a bit and used a 5mm HSS drill bit to enlarge the holes, before bending them back to an upright position again. Clearly, this is going to void your warranty. I guess there are other options for mounting the fan, without drilling out the holes, for example you could attach it with cable ties looped through the metal tabs, or superglue it to the base. I went for the screws option, as the fan needs to be securely mounted, to avoid vibration and further annoying noises.

IMG_3296

You can now screw the new Noctua fan into the metal flaps, using the screws provided in the box with the fan.

IMG_3308

Pay attention to the orientation of the fan. The side with the sticker needs to face towards the main PCB, as shown above.

You can now re-fit the main PCB. Without wanting to sound too much like a Haynes manual, reassembly is the reverse of removal.

Once the main PCB is back in place, re-attach the hard disk.

Don’t forget to plug the fan into the PCB, using the 2-pin adapter that came with the fan.

With the lid still off the DVR, plug in the power adapter (be sensible here, don’t touch anything inside as you do so) and make sure the fan spins up. If it does, then you can put the lid back on and connect up all the cables. You’ll notice when it’s powered up again that it’s much quieter than before. You’re welcome. To demonstrate just how much quieter, here’s a dB meter reading taken from the same distance away from the DVR, following the installation of the new fan.

IMG_3300

So the noise has gone from 74.3dB down to 45.8dB. Don’t read too much into the actual numbers, this was only a free dB meter app on my iPhone, but it’s pretty clear that the new fan has made a big difference. Remember that the dB scale is not linear, so that’s a significant decrease in noise.

The Noctua fan runs at slower RPM than the original fan, which is partly why it’s so much quieter. Because of that, I thought it might result in an increase in temperature of the unit. I checked before I started and the DVR was reporting an internal temperature of 31 degrees C. After changing the fan, I left it a couple of hours to warm up and checked the temperature. It had gone down to 28 degrees. So, not only is the new fan quieter, it also seems to perform better.

Root Cause 

The root cause of the problem with noise from the DVR unit is the use of a cheap fan, which operates at too high a noise level. A better testing regime by Swann should have identified and fixed this before the product was launched.

Also, there is no thermistor control, so the fan is always on, at a constant speed, no matter what the internal temperature. They could have managed the cooling better and had the fan only kick in when the temperature rises above a threshold.

Swann could also have designed the internals of the unit a bit better. The DVR unit is arranged with perforated sides, taking cool air in the left side of the unit (when viewed from the front) and expelling hot air out of the right hand side. The fan is in the middle and draws in air, pulling air across the heat sinks on the main processor and other components. That’s all good, although there’s no baffling or anything to channel the air inside the unit. The fan then blows that warm air into the hard disk, which sits on the other side of the fan – not exactly ideal. The hard disk blocks the flow of air and due to the lack of baffling inside the unit, there’s nothing stopping that warm air from flowing around inside the unit, rather than being expelled out of the exit vent. We’re certainly not talking Apple levels of design here, but I guess it does the job.

One thing that particularly annoyed me about the design was the little metal tabs that the fan screws onto. I had to take the entire unit apart to remove the fan. If they’d just cut the tabs the opposite way, so they face the hard disk, all that would be required to remove the fan is to unscrew the hard disk and move it out of the way. I guess they never intended the unit to be messed around with by end users, but surely that simple change would have made life easier for Swann when fixing units under warranty too.

Other Stuff

The fan I used was a Noctua fan of the same dimensions as the original fan fitted by Swann (40 x 40 x 10mm). There is plenty of room where the fan is to fit a deeper fan, say one 20mm rather than 10mm deep. That would allow for a greater volume of air to be moved by the fan, which would allow it to run at a lower RPM and therefore be even quieter. The downside would be that the output side of the fan would be even closer to the hard disk and would have less room to escape around the disk, so it may increase turbulence inside the unit. If you decide to try a 20mm deep fan, please leave a note in the comments with your findings. I’d be interested to hear how it works noise-level wise and how it affects the internal temperate reported by the DVR.

For those that may be interested in replacing the hard disk, below is a picture of the label showing the model and specs of the OEM unit.

IMG_3307


10 Comments

Filed under Gadgets

Dashcam Hacking

I’ve been playing around with my Blackvue dashcam a bit recently. Partly for fun and partly to figure out if I can copy videos from it to my iPhone’s camera roll. Having Googled about a bit, I found an unusually helpful Amazon review, where someone talked about FTP-ing onto the camera and copying off the videos.

http://www.amazon.com/review/R5EAUUH05X1FZ/ref=cm_cr_pr_viewpnt#R5EAUUH05X1FZ

I liked the idea of this, so I gave it a go. Unfortunately, the Amazon post was about a DR500 and it seems Blackvue have changed a few things on the DR650 that I have, so my attempts didn’t work. I’ll explain a bit about what I did though, so anyone else that’s going down the same road can hopefully save some time.

According to the Amazon review, the Blackvue has a default IP address of 192.168.8.1. I confirmed this by scanning the network for devices. Sure enough, 192.168.8.1 was the only IP address on the network. A quick ping test showed a response from that address too, so a good start!

I tried putting the camera’s IP address into my web browser whilst connected to the camera’s WiFi & I got the following page:

Blackvue_web_root

Not especially useful, it’s just a blank page with “Blackvue” written on it, but it does confirm two things; I’ve got the right IP address for the camera and it’s running a web service. I tried a few variations on the URL, such as http://192.168.8.1/Blackvue, but none of them bore any fruit. Something I’d read on a forum indicated that there was a live stream available at http://192.168.8.1/blackvue_live.cgi, so I tried this. Sure enough, I got a live stream up on my screen:

Blackvue_web_live

I tried a few guesses at what the URL might be for the live stream of the rear camera, but I couldn’t figure it out. I then tried running a web crawler against the web site to see what pages were available, but nothing was returned. I guess this means that all the available pages are cgi scripts. Without being able to access the filesystem of the camera’s web root, I wouldn’t know what cgi scripts are availble, so I tried ssh-ing to the device. No joy.

Next, I tried a port scan on it, so see what my options were for getting into it. The following was returned:

Blackvue_scan

Looks like it’s a bit more tied down than the older DR500. There’s no telnet or FTP open, just DNS (port 53), which won’t be much use to me, and http (port 80), which I’d already found. It’d be great if I could somehow start an ssh server on there, but without getting into it in the first place, I can’t do that.

At this point, I’m bit stuck for a way to access the device. I need to start ssh, or ftp, or some sort of service that I can use to pull the files off the device. I downloaded the firmware for the camera from Pittasoft’s website. I thought if I could inspect the code, I could maybe modify it to give me a way in. Unfortunately, the firmware ships as a single binary file. I tried inspecting this, but I haven’t had much joy yet.

So, stuck again, I got to thinking how the Blackvue app copies files from the camera to the app. If the only service available for it to do this is http, then the files must either be available for download via http, or the app must run some sort of cgi script that starts an ssh/ftp server and copies the files over, then stops the server. My next trick will be to open the app and download a video clip, then do another port scan to see if something has been opened up during the transfer.

What would be really useful would be to get a look at the web root of a DR500, as I suspect most of the cgi scripts etc would be the same or similar to the DR650. I might be able to work out a way in if I could see what the scripts are doing. Unfortunately, I don’t have access to a DR500 to do this, so if you do and you’ve tried anything like this, I’d be interested to hear your comments.

UPDATE 17/10/2014:
I had a bit more of a play with the Blackvue today. I tried copying a video from the camera to my iPhone and running a port scan on the camera whilst doing so to see if the transfer had opened up FTP, or SSH or something. Nothing. This means that the videos must be transferred via HTTP download, which limits my options for getting into the camera. What I really want to do is start an SSH or telnet session on there, so I can do whatever I want, however with only port 80 available to me, that may be difficult.

You may have heard of a bug called ShellShock that’s been in the headlines recently. ShellShock is a bug in the way the bash shell handles environment variables and it’s possible to exploit it via cgi scripts on a vulnerable server. The DR650 uses a cgi script to serve the live feed. Thinking that it may well initiate bash in some way, I thought I’d try and exploit ShellShock on the DR650 to break into it and start an SSH shell.

I tried the following to try and start an ssh server on the camera:

wget -U “() { test;};echo \”Content-type: text/plain\”; echo; echo; /sbin/service sshd start” http://192.168.8.1/blackvue_live.cgi

What I’m trying to do here is set the Content-Type variable and add a bit of code on the end to try to exploit ShellShock and get bash to execute a command to start an SSH server. This didn’t work. There’s lots of reasons why that might be the case – the device might not be running a vulnerable version of bash (unlikely), the cgi script might not call bash, the command I’m trying to run might not be valid, the script might not use Content-Type, or a myriad of other reasons. I tried a few different permutations of this hack, before deciding to quit & try another approach.

From a bit of research, I believe that the DR650 uses a Texas Instruments chipset, running a DaVinci platform. A bit of digging shows that this platform is based on a Linux distribution called MontaVista. I’ll do a bit more research into that platform and see if I can refine my methods for getting into it.

In the meantime, I began looking through the firmware image I downloaded, having discovered it was gzipped and unzipped it. I’ve found a few useful bits of data. There seem to be very few files hosted by the camera’s web service. They are:

System/www/blackvue_live.cgi
System/www/blackvue_vod.cgi
System/www/upload.cgi
System/www/index.html

I already found the index.html and the blackvue_live.cgi, but I didn’t know about the other two. The upload.cgi file seems to be used to upload new config & firmware to the camera and blackvue_vod.cgi returns a list of video files stored on the camera. Could be useful!

upload.cgi
upload

blackvue_vod.cgi
blackvue_vod

The blackvue_vod.cgi file looked very interesting. I said earlier that the video files must be downloaded via HTTP, but I didn’t know their location. The output of blackvue_vod.cgi indicates that the files are in the web server’s docroot, under a /Record folder. The script also returns the full path & filename of every file available. I immediately tried a wget of one of the files and sure enough, it was downloaded onto my laptop 🙂

[~]$ wget http://192.168.8.1/Record/20141017_163635_NF.mp4
–2014-10-17 16:38:17– http://192.168.8.1/Record/20141017_163635_NF.mp4
Connecting to 192.168.8.1:80… connected.
HTTP request sent, awaiting response… 200 OK
Length: 64500078 (62M) [text/plain]
Saving to: ‘20141017_163635_NF.mp4’

100%[======================================================================>] 64,500,078 1.05MB/s in 60s

2014-10-17 16:39:16 (1.03 MB/s) – ‘20141017_163635_NF.mp4’ saved [64500078/64500078]

[~]$

Excellent! My original intention was to download the videos onto my iPhone’s camera roll so that I could then transfer them onto my laptop, but with this, I can hook my laptop up to the camera’s WiFi and download the videos straight to it. So, time to automate it a bit. I can get a list of files with a simple curl command:

[~]$ curl http://192.168.8.1/blackvue_vod.cgi
v:1.00
n:/Record/20141014_202528_NF.mp4,s:1000000
n:/Record/20141014_202528_NR.mp4,s:1000000
n:/Record/20141014_202629_NF.mp4,s:1000000
n:/Record/20141014_202629_NR.mp4,s:1000000
…..

This is then easily tidied up a bit with some simple sed to give me just the path and filenames:

[~]$ curl http://192.168.8.1/blackvue_vod.cgi | sed ‘s/^n://’ | sed ‘s/,s:1000000//’ | tail
% Total % Received % Xferd Average Speed Time Time Time Current
Dload Upload Total Spent Left Speed
100 16508 0 16508 0 0 283k 0 –:–:– –:–:– –:–:– 424k
/Record/20141017_163635_NF.mp4
/Record/20141017_163635_NR.mp4
/Record/20141017_163736_NF.mp4
/Record/20141017_163736_NR.mp4
/Record/20141017_163837_NF.mp4
/Record/20141017_163837_NR.mp4
/Record/20141017_163937_NF.mp4
/Record/20141017_163937_NR.mp4
/Record/20141017_164052_PF.mp4
/Record/20141017_164052_PR.mp4
[~]$

This returns the paths of the most recent 10 videos. I can then use a simple for loop to pipe this into wget to download the videos:

[~]$ for file in `curl http://192.168.8.1/blackvue_vod.cgi | sed ‘s/^n://’ | sed ‘s/,s:1000000//’ | tail`
> do
> wget http://192.168.8.1$file
> done
% Total % Received % Xferd Average Speed Time Time Time Current
Dload Upload Total Spent Left Speed
100 16332 0 16332 0 0 170k 0 –:–:– –:–:– –:–:– 201k
–2014-10-17 16:44:57– http://192.168.8.1/Record/20141017_163837_NF.mp4
Connecting to 192.168.8.1:80… connected.
HTTP request sent, awaiting response… 200 OK
Length: 63807644 (61M) [text/plain]
Saving to: ‘20141017_163837_NF.mp4’

100%[======================================================================>] 63,807,644 2.32MB/s in 55s

2014-10-17 16:45:52 (1.11 MB/s) – ‘20141017_163837_NF.mp4’ saved [63807644/63807644]

–2014-10-17 16:45:52– http://192.168.8.1/Record/20141017_163837_NR.mp4
Connecting to 192.168.8.1:80… connected.
HTTP request sent, awaiting response… 200 OK
Length: 23644147 (23M) [text/plain]
Saving to: ‘20141017_163837_NR.mp4’

100%[======================================================================>] 23,644,147 1018KB/s in 20s

2014-10-17 16:46:12 (1.16 MB/s) – ‘20141017_163837_NR.mp4’ saved [23644147/23644147]
……

It takes around a minute to download a video from the front camera and around 20-30 seconds for the rear camera. I probably don’t want to be downloading the entire contents of the memory card each time, but I can easily tell it to just download the videos from today:

[~]$ export BVDATE=`date +%Y%m%d`
[~]$ echo $BVDATE
20141017
[~]$ for file in `curl http://192.168.8.1/blackvue_vod.cgi | sed ‘s/^n://’ | sed ‘s/,s:1000000//’ | grep $BVDATE`
> do
> wget http://192.168.8.1$file
> done

All I need to do now is put this in a script, then I can download today’s videos by simply connecting my laptop to the camera’s WiFi and running the script.

I’m still interested in hacking the camera and getting a shell on there to play around a bit more, so I’ll continue to try to find a way in.

UPDATE (09/02/2015):

A recent update to the BlackVue app on the iPhone has enabled another option for exporting video – “COPY TO ALBUM” (no need to shout!). This copies the file to the camera roll:

iPhone 6 024

42 Comments

Filed under Cars, Gadgets

Blackvue DR650GW-2CH Dash-Cam

A while ago, I started using a dashcam app on my iPhone called CarCorder. I used this for a while and whilst it did the job well enough, it was a bit of a pest having to put my phone in the windscreen mount every time I got in the car. Also, the app drained my phone’s battery pretty quickly if it wasn’t plugged in to power. As a consequence, I got out of the habit of using it.

I recently decided to splash out & buy a proper dashcam, so I drew up a list of “must have” requirements that went something like this:

  • Good quality video, day and night, ideally HD
  • Large capacity to store the footage
  • Small & unobtrusive design
  • Able to be left in the car and automatically record every journey without user intervention
  • Built in GPS

I also had some “wants” that I didn’t consider quite so important, but would really like to have:

  • A rear camera as well as front
  • Wifi, to be able to get the footage off the device without removing the SD card
  • Parking mode

I spent a while looking around at the various dashcams on the market and found a market flooded with cheap, but crappy devices. After digging a bit further, I managed to find a few devices from more reputable manufacturers that looked of acceptable quality, however most of them were of an absurd size. A lot of the devices I looked at had screens on the back of them. Personally, I can’t understand this. Why do I need to see on a screen what I can already see out of my window? This type of device would be no good, as I wanted something as small as possible that could sit discreetly in the car permanently. I did find a few cameras that seemed small & unobtrusive and were reviewed well and I decided that a Blackvue DR550DW-2CH met my requirements the best.

I deliberated over buying the DR550 for a while, whilst I read some reviews to see if it was as good as it seemed. During this time, Blackvue launched an updated version, the DR650GW-2CH. This was much the same as the 550, but with a couple of things that I appreciated; an all-black finish (without the silver ring of the 550) and compatability with 64GB micro SD cards (as opposed to 32GB on the 550).

Note that the “GW” in DR650GW-2CH means it has GPS and WiFi and the “2CH” means it’s two channel, so it has a rear camera.

The DR650GW-2CH seemed to meet all my requirements, so I took the plunge and bought one. I bought mine from here:

http://www.blackvue.eu/Blackvue_DR650GW.php

I paid £329 for the camera, with a free Smart Power kit. Of course, the day after mine arrived, they dropped the price to £310. Sigh.

The camera arrived last week and I took a few pics of the box:

On the left is a soft pouch, then the SmartPower kit and the Blackvue box on the right.
Blackvue_box_ext

The front camera (top) and rear camera (bottom).
Blackvue_box_int

The other bits that come in the box; cables, a micro-SD card reader and some cable tidy sticky pads.
Blackvue_box_bits

I installed my kit last week and found the installation really easy. They say they recommend having the device fitted by a professional, but I really wouldn’t bother if you’re at all handy with this sort of thing. It took me around half an hour to install and I wasn’t in any real hurry. Firstly, I fitted the front camera in a spot behind my rear view mirror. I have a bunch of sensors for lights & windscreen wipers behind my mirror, so I had to put mine slightly to the side. I then connected the power lead and ran it around the windscreen, under the passenger dash and along the transmission tunnel to a cigar lighter socket in my center console. The kit comes with little sticky pads to help you clip your cable to your windscreen, but I didn’t use any of these. Instead, I just tucked the cable in gaps in the trim as it gives a neater install, with the cables all completely invisible. Also, I have a heated windscreen and I wasn’t sure how well the glue on the sticky pads would cope with that.

The camera installed behind my rear-view mirror
Blackvue_front_closeBlackvue_front_screen

After fitting the power cable, the main device was ready to go! I still had to fit the rear camera though, so I ran the single cable from the front camera to the back of the car and installed the rear camera at the top of the rear window. I was a bit worried the cable wasn’t going to be long enough to reach to the rear camera whilst taking a slightly indirect route in order to hide the cable well. As it turned out, there was about 6″ spare cable in the end. Depending on the size of your car, this may or may not be an issue. My car is a Jaguar XF, so anything much bigger than that and you’ll probably struggle, but you should be ok with something around the same size, or smaller.

The rear camera
Blackvue_rear_closeBlackvue_rear_screen

I’ve read reports of the older DR550GW’s rear camera cable interfering with DAB radio antennas. My car has a DAB radio antenna in the rear window and the camera’s cable runs pretty close to it. I’ve had no issues with either my DAB radio, or the rear camera since installing it, so I guess the issue doesn’t apply to the DR650GW-2CH.

I have my power connector plugged into a cigar lighter socket, which means that the camera starts automatically when I unlock the car and turns off automatically when I lock it. My kit came with a Smart Power adapter, which looks like it’s designed to connect directly to the car’s battery. This has a little black box that controls the power to its own cigar lighter socket which you then plug your camera into. The idea is that the camera then has permanent power, meaning parking mode can be used. The black box is supposed to monitor the battery’s power level and cut power to the camera when it goes below a certain voltage, in order to prevent your camera from draining your car’s battery. I haven’t installed this yet, but I intend to, as soon as I’ve figured out my car’s fuseboxes well enough to find a suitable spare fuse to attach the device to.

Once my camera was set up in the car, I enabled WiFi, by simply pressing the WiFi button on the side of the camera. The camera responds with a voice confirmation of “WiFi enabled”. Nice. I then connected my iPhone to the WiFi network provided by the camera and opened the BlackVue app. I could then select the WiFi connection and view a live feed from the camera in order to position the cameras optimally. I had a look through the settings via the app and decided that I didn’t want most of the voice confirmation messages that you get when the camera powers on, off, records an event etc, but I still wanted voice confirmations when I turned WiFi on/off or enabled/disabled sound recording.

After going for a short test drive, I connected to the camera via the app again and downloaded the footage from the front and rear cameras to my phone. I could then view the videos from within the app, including a map overlay showing the car’s position, as well as a small bar at the bottom showing the car’s speed.

Video playback in the iPhone app
Blackvue_playback_front

I later on tried to copy the video from my phone onto my PC, but found that I couldn’t. When you save a video to “Internal Storage” in the Blackvue app, it doesn’t put it in your camera roll on iOS (not sure about on Android). Instead, it seems to keep the video within the app, meaning you can’t easily copy it off your phone. The options in the app let you upload it to YouTube, but that’s about the only way of getting video out of the app as far as I can tell. This seems like a bit of an oversight and hopefully a future software update will bring a way to get the footage off my phone. In the meantime, I’ve got a few ideas of how to get the videos into my phone’s camera roll and I’ll post an update if I have any luck. In the meantime, I can get the video onto my PC by simply removing the micro SD card from the camera and putting it into my PC. This is no worse than most of the other cameras on the market, so I’ve not lost a great deal here.

Options available for exporting videos within the Blackvue app
Blackvue_app_export

First impressions of the DR650GW-2CH are good. I’ll update this post as & when I play with it and discover more features.

3 Comments

Filed under Cars, Gadgets

Clifton Engagement Ring Presentation Case

I recently proposed to my girlfriend of five years (she said yes, you’ll be pleased to hear!). I chose to propose whilst away on holiday, which posed challenges with keeping it a surprise until the right moment. I was worried about getting the ring through airport security without them giving my game away, but I was more concerned about how to present the ring nicely when I proposed, whilst being able to conceal it until then.

Most rings come in a presentation box of some kind. These are usually perfectly nice, but reasonably bulky. As I was intending to propose in New York in September, the weather was pretty warm, so I wasn’t wearing a coat, or anything with a lot of scope for concealing a bulky ring presentation case.

Not long before we were due to go away to New York, I came across the Clifton presentation case, by a Vancouver based packaging designer called Andrew Zo. He’d designed a presentation case that elegantly answered my problem. His case is slim and small, about the size of a credit card and around 1cm thick. Here it is below against an iPhone 5 for a size comparison:
Clifton_closed_flatClifton_closed_side

The case holds the ring flat, but when opened, via some origami genius, it swivels the ring, so it’s presented upright in all its glistening glory…

ring1
(image credit Andrew Zo – http://andrewzo.com/)

With only just over a week to go until we flew to New York, I got in touch with Andrew to make sure he’d be able to get a case to me in time before I submitted an order via the website. Andrew was really helpful and understanding of my timescale predicament, despite high demand for the product. In the end, I paid for an express UPS delivery, which though expensive, got the case to me in time.

The case works really well and holds the ring snugly, presenting it beautifully. It’s expensive, at $99CAD but I figured you can’t put a price on that special moment and once converted to GBP, it works out at a more palatable £55 or so, depending on the exchange rate. If you’d like one, you can order online here:

Clifton

Here you can see my case open, showing where the ring slots into the holder and the cut-outs where it lives when closed:

Clifton_open

Summary:
A brilliant idea that elegantly solves a real problem for nervous men the world over. It’s pricey, but it’s also beautifully hand made from quality materials. I’m really glad I bought one and it served its purpose perfectly.

Leave a comment

Filed under Uncategorized

Issentiel iPhone 6 Pouch

Since my shiny new iPhone 6 (4.7″ version) arrived a week or so ago, I’ve been keeping it my pocket, unprotected by a case. For the past few years, I’ve used iPhone cases that I’d describe as leather slip pouches, where you slide your phone inside and remove it by pulling a toggle that lifts the phone out of the pouch. I guess it’s just personal preference, but I prefer to use my iPhone unhindered by cumbersome addenda. This type of case allows me to carry it around protected, but to be able to easily remove it from the case, so I can use it as Apple intended.

After ordering my iPhone 6, I had a look around for this type of case, but there were none that caught my eye. I used to use a Snugg case for my iPhone 5, which I liked a lot, but their iPhone 6 version isn’t yet available and is only available to pre-order in black, which I’m not so keen on:

http://www.thesnugg.co.uk/smartphone-cases/apple/iphone-6/pouch/black-pouch.aspx

After a bit more looking around, I found the Issentiel “Allure” range of iPhone 6 pouches in a variety of colours. They’re a bit pricey at £29.90, but a bit different too, so I thought I’d give them a go.

http://www.issentiel.co.uk/apple/iphone-6-leather-cases/iphone-6-leather-pouch-allure.html

I ordered a case from their website direct, which I was able to pay for via PayPal, so plus points for not making me type my card details. They dispatched the case, which I was able to track on its journey from France via FedEx tracking. When it arrived, it came in a well packaged parcel, in a rather unnecessarily fancy box.

issentiel_box

Opening the box revealed a sock for my leather pouch to live in. Again, a bit of an unnecessary extravagance.

issential_box_inside

Then, I got to the pouch itself and first impressions were good. It has a good quality feel, with nice detailing.

issentiel_top

I’ve been using it for a couple of days now and over the course of daily use, I’ve made the following observations, positive and negative:

+ I really like the style & colour. I was initially a bit unsure about the blue, but I like it. It’s different.
+ When I pull the toggle to remove the phone, a good 1/3 of the phone pops out. Some other cases have much shorter toggles where just a slither of phone is released & you have to grapple it out of the case

When the phone is in the case in my pocket, the ringer is more muted than I’d expect, meaning I end up turning up the volume, which then startles me when it’s on my desk outside of the case and it rings more loudly than I expect. This is probably because the holes in the bottom of the case for the speaker don’t line up at all with the actual speaker! Bit of a design flaw in my opinion. My old Snugg case for the iPhone 5 had the holes in just the right place.
issentiel_speaker
The tab that you pull to remove the phone doesn’t have a magnet built into it. My old Snugg case had a magetic tab, which used to attach itself to the case to keep it in place. I liked this. In comparison, this one just flops about. The plus side is that the tab itself is thinner and causes less of a bulge on the back of the case. I’m not even sure how useful the little magnet was in my old case, but I miss it all the same.

issentiel_back

issentiel_inside

Summary:

I think overall, I like the Issentiel case. The style and range of colours are great and a bit different from other cases on the market. I do think they’re a bit pricey though. The Snugg case is half the price (£14.99 vs. £29.90 for the Issentiel) and looks better designed in terms of functionality. Although the Snugg is currently only available in black leather, I’m sure more options will become available in time. I’d rather Issentiel saved some money on the overly fancy packaging and either spent it on development to put the speaker holes in the right place, or just made the thing cheaper.

Leave a comment

Filed under Uncategorized

Nest Protect – Smart Smoke/Carbon Monoxide Alarm

protect-front-black_small

Following their success with the Nest thermostat, the Nest team have turned their hand to the humble smoke alarm for their next product – Nest Protect. Doesn’t sound very exciting does it? But then neither did the thought of replacing your thermostat and that seems to have worked out well for them. As with their thermostat, Nest have addressed a number of fundamental design issues endemic with all smoke alarms and produced a product that just makes so much sense.

Nest Protect is available in two colours; white, or black. It’s also available in either mains powered, or battery powered versions.

So what is it? Well, it’s a smoke alarm, to start with. It’s actually a combination smoke and carbon monoxide alarm, which is a good start, as it’s already combined two devices into one. It connects to the internet via your wifi network, which allows it to communicate with your smart phone via the Nest app. This allows it to send you notifications if it detects sufficient smoke or CO to trigger an alarm condition. It also means you can fire up the app at any time and check its status. So that’s the “internet of things” box checked then. Actually, in my opinion, that’s not the best bit about it. My favourite features of the Nest Protect are the way it addresses two key problems with traditional smoke alarms:

  1. Dying batteries keeping you awake with an incessant beeping
  2. Having to wave a tea-towel in front of it like a lunatic when you burn some toast

The first one is actually quite a serious issue. When a smoke alarm’s batteries are dying, most smoke alarms will beep periodically. Inevitably, this will start in the middle of the night and will drive you ’round the bend sufficiently to remove the battery to stop it from beeping. Not only does this mean navigating a ladder (or more likely a makeshift ladder, such as a rickety chair) to get to the alarm to take the battery out, but it means that you have no smoke alarm until you replace the battery. Chances are you haven’t got a spare in the house, so you’ll be without a smoke alarm until you remember to get a new battery. The safety implications of this are pretty evident.

Nest Protect addresses this issue in a couple of ways. Firstly, it will give you a visual indication of its status when you turn the lights off at night. Nest Protect has a light sensor and when the room goes dark, for instance when you turn the lights of at night, it will glow green to let you know all’s well. If the batteries are low, or there is some other issue, it will instead glow yellow, letting you know there’s something that needs checking. You can then fire up the app and check its status. Secondly, you can see the status of the battery at any time from the app, meaning you can arrange to change the battery in plenty of time.

The way Nest Protect addresses the second issue is quite ingenious. In addition to its sensitive smoke detector, it also has a heat sensor. Rather than just sounding an alarm when any smoke is detected, it can judge how serious the alarm is. If you burn some toast or something minor and Nest Protect detects it, it will trigger a minor alarm. Instead of sounding a shrill alarm, it will simply give you what it calls a Heads-Up. The light on the alarm will go yellow and it will speak to you, telling you that an alarm has been triggered, saying something like “smoke detected in the Living Room”. Nest Protect also has motion sensors and you can silence an alarm simply by waving your hand in front of it (as long as the alarm isn’t what it determines to be serious, i.e. high smoke/heat/CO levels).

I was sufficiently impressed by the device to place a pre-order for one, which arrived the other day. I ordered a black, battery operated one and here’s my view on it so far…

Ordering & delivery:
Firstly, I had to choose which one to go for. I intended to replace a traditional smoke alarm in my living room. It’s not mains wired, so I went for the battery powered version. The existing alarm was mounted on a wood beam on my living room ceiling, so I ordered the black version, to blend in with the dark coloured beams better.

Nest didn’t charge my card (£109 by the way) until the device was shipped and an email confirmation was sent informing me of the expected shipping date. The device shipped as promised on that date and another email confirmation was sent to inform me, including a tracking number. Unfortunately, I wasn’t at home when the delivery was attempted, but ParcelForce left the parcel at my local Post Office, rather than taking it back to the depot (which is miles away) so it was reasonably convenient for me to collect it.

iPhone5 039

Installation:
Included in the box were the mounting plate, including screws, the Nest Protect itself and some instructions.

iPhone5 038

The first thing to do is get the device connected to your network. To do this, you need to download the Nest app on your smartphone and fire it up. You’ll need to create an account first, following which you’ll be sent an email containing a link that you’ll need to click in order to activate your account. For me, this email took about 20 minutes to arrive, so it would be a good idea to download the app and create an account before the device arrives if you’re planning on ordering one.

Whilst I was waiting for the email to arrive, I set about fitting the mounting plate. The mounting plate has quite a lot of options for screw placement, so you may find that if you’re replacing an existing smoke detector, you can re-use the screws, or at least the screw holes. In my case, I decided to relocate the smoke detector from the side of the beam, to the bottom of it. I did this for a couple of reasons:

  1. I can wave my hand underneath it quite easily with it facing down, however in its original position, facing sideways, I’d have to stand on something in order to raise my hand high enough for the Nest Protect to detect it.
  2. I wanted to try the Pathlight feature, where if it’s dark and Nest Protect detects motion, it will glow white, as a sort of night light, to light your way. This wouldn’t have worked very well if it was mounted sideways.

The physical installation of the baseplate was very simple and gave me a chance to try out a gift that I’d recently received – a magnetic wrist band, for holding screws etc:

iPhone5 050

Once my email confirmation had come through, I activated my account and followed the instructions to set up the device itself. It’s a simple process, which consists of the following steps:

– Open the app and follow the on-screen instructions to scan the QR code on the back of the Nest Protect
– The Nest Protect will then create its own wifi hotspot that you then connect your phone to
– Nest Protect will detect available wifi networks

iPhone5 045

– Choose your home wifi connection and give it the password

iPhone5 046

– Nest Protect will now take a minute to get connected and configure itself

iPhone5 047

Once it’s set up, you mount the Nest Protect to its mounting plate by lining up the holes on the back of the device with the pegs on the baseplate and twisting it clockwise slightly to secure it in place.

Use:
Once installed, I gave it a bit of a test. I rolled up some paper into a tube and lit the end, then blew it out. I held it under the Nest Protect, with plenty of smoke flowing into the Nest. At first, it didn’t react, but after about 10 seconds, it glowed red and sounded the alarm. At the same time, my phone made an alarm sound and an alert notification came through. I silenced the alarm and about five to ten minutes later, the Nest glowed green and announced that the smoke had cleared. Seems to work just as expected then.

Summary:
An excellent product that comes up with some really innovative ways of addressing age-old problems with traditional smoke alarms, albeit at a price. £109 is pretty steep for a smoke alarm, especially as most homes have more than one. To me though, the pricing doesn’t seem unreasonable, given the functionality.

It should be noted that Nest aren’t the only ones in the “smart smoke alarm” market. Birdi (formerly Canary) are an Indiegogo project (at $18,000 of a $50,000 target at time of writing) that is destined to do much the same thing as Nest Protect at a slightly cheaper price point. Having been beaten to market by a company with the clout of Nest probably isn’t the best start to their project, but it does look interesting and has a slightly different feature set.

Leave a comment

Filed under Uncategorized

tado Smart Thermostat

img.php

I’ve been on the lookout for a smart thermostat for literally years now. Smart thermostats aren’t a particularly new thing, with devices available from manufacturers like Heatmiser and Honeywell for several years, however Nest really shook up the market a couple of years ago, when they launched the first version of the Nest thermostat. Designed by Tony Fadell, the man responsible for Apple’s iPod family, the Nest is a beautiful bit of kit and I immediately decided I must have one. My hopes were quickly dashed when I realised that Nest was designed for the US market, who’s heating systems work in a different way to European systems, meaning Nest cannot be used in Europe without some serious modifications. Nest said they were planning on launching in the UK, but wouldn’t give a date. Over two years later and well into the second generation of Nest thermostat and there’s still no UK launch date.

It was about a year ago that I first heard of tado, who appeared to be offering a Nest-like thermostat for Europe. This seemed to be just what I wanted, so I began looking into it. I was initially disappointed with the tado, upon discovering it was just a plain white box, which seemed a bit of an anticlimax when compared with the Nest. Having looked a bit further into tado, it became clear why the device itself is so plain. This is the single biggest difference between tado and Nest – Nest is all about the thermostat, whereas tado is all about the system and the thermostat is just another component of that system that the user shouldn’t have to worry about. Thinking about it further, this approach makes so much more sense. Although Nest has smart phone control, the thermostat itself is stil the main focal point. Yes, the thermostat is a lovely bit of hardware, but why does it need to be? If it’s such a smart heating system, why do you still need to touch the thermostat? tado take a different approach – All of the bling is in the app rather than the thermostat, as that’s where you control it from. It’s a beautiful and easy to use interface and you find yourself simply forgetting about the hardware.

My old thermostat & heating timer were pretty crude and, I suspect, a common setup in the UK. I could program two or three heating periods so the heating comes on for a bit in the morning while I wake up and get ready for work, then on again in the evening and off when I go to bed. I could have different programs for weekdays and weekends, but that’s about the extent of it. Unfortunately, my life doesn’t conform to such rigorous schedules and my house would often be heated whilst I wasn’t in, or not heated enough if for example I got up earlier than usual.

The tado is much more flexible. You can still program periods when you want your house to be heated, but if you need to make a change to that schedule, it’s far easier to do so. If I’m leaving home early tomorrow and I want the house to heat up earlier, I can now simply make the one-off change in less than a minute from my phone. Previously, I’d have had to have scrabbled about re-programming some indecipherable device in a cupboard in my hallway, which I simply wouldn’t have bothered with. Even smarter still, tado will use geo-location services on your phone to work out how far away from home you are. If I’m away from home for a few days, tado knows and won’t bother heating the house as much. When I come home, tado knows I’m on my way and heats up the house so it’s nice & warm when I get home. This is the feature that I bought tado for and its distinguishing feature from other products on the market.

You can link several smart phones (iOS or Android) to tado, so if there are several people in your house, it won’t turn off the heating until the last person leaves the house and it will warm up again as the first person is on their way back. You can also set what temperature you want tado to maintain when you’re at home and when you’re away, as well as while you’re asleep at night.

Tado learns the thermal properties of your home and will adjust itself to it. What this means is that instead of programming your heating to come on at 6:30am in the hope that it’ll be warm when you wake up at 7am, you can tell tado that you want your house to be 21 degrees at 7am and it will work out what time it needs to turn on the heating in order for your house to have warmed up to 21 degrees by that time. Because tado is internet connected, it can look up the weather for your home and judge whether it will need to turn on the heating early because it’s a bit frosty outside, or whether it’s unusually sunny and it can rely on sunlight beaming through your windows to help warm up the house. Clever stuff.

The main reason I became more interested in tado was their use of geo-location on your smart phone to work out whether you’re home or not. The Nest utilises motion sensors in the thermostat unit to work out if anyone is home. It takes Nest a few hours to work out that you’ve left the house, as it has to allow a reasonable amount of time without anyone moving near the thermostat before it decides the house is empty. Conversly, tado knows immediately that you’ve left the house, because your phone tells it so. All sounds good doesn’t it? I thought so, so I bought one. Here’s a summary of my experiences after running it for a few weeks:

Ordering & delivery:
My first impressions of customer service weren’t great. Having been told that my tado would ship on launch day (the 1st of November), I was disappointed that mine still hadn’t shipped a full ten days later. It took them several days to respond to my service request enquiring about the delivery too (although they responded to Twitter more quickly). Not brilliant, but I’ll put it down to a launch-date rush and hopefully this will become slicker with time. The website and the ordering process is nice and straightforward and the delivery tracking via DHL is great.

Installation:
Again, not a great first impression. After my device had arrived so late, I was really keen to get it installed ASAP, so I logged in to the web interface to get the installation instructions for my setup, only to find… no instructions. A call to support revealed they hadn’t got all of the installation routines live on the web yet and mine would be up in a couple of days. The next day, although instructions specific to my setup weren’t available, some generic instructions had been put online, so I took the plunge and went for it. Installation was pretty simple, though actually completely different to what I’d expected.

Tado bits:

Top left: The tado controller, top right: The tado “connector”, bottom: wireless thermostat
iPhone 5 074

The other bits that come in the box. Everything you need is here, including all screws, rawl-plugs and even stickers to label the cables as you remove them from your old control unit & thermostat.
iPhone 5 076

I had thought of tado as a thermostat replacement and I expected to replace my existing thermostat with the tado box. I assumed that I would set my heating controller to permanent on and let Tado control the heating via the thermostat connections. The way it actually works is the complete opposite of that. The tado box replaces the heating controller and the thermostat is replaced by a blanking plate containing a circuit that basically bypasses the thermostat connections entirely, instead relying on a new, wireless thermostat device that came with the tado. This makes sense, but was a lot different to what I was expecting. The wiring for the heating controller was more complicated than the thermostat, but still pretty simple and not too much for anyone competent with DIY and home electrics to do themselves. Many people of course aren’t comfortable working with 240v electrics, which is fair enough and you have the option for tado to arrange an engineer to install it for you at an additional cost.

Tado installation:

The blanking plate that replaces your thermostat
iPhone 5 008

The wiring of my old heating controller
iPhone 5 084

The main tado box, installed where the heating controller used to be
iPhone 5 002

My old heating controller and thermostat
iPhone 5 009

It’s worth noting that while my experience with the installation instructions wasn’t great, it was again down to Tado being ill-prepared at launch and by now, the installation would be much slicker. The online installation guide is actually one of the best I’ve seen and I particularly liked the visual indicators showing the success of various steps as you perform them. For example when you plug the gateway device into your router, a box on the web interface turns green to show that it can be seen by the tado servers. The same happens when you turn on the power after installing the tado box itself. This in particular gave me a warm fuzzy feeling, as there’s always a bit of nervousness after installing something like that – “have I wired it up right? Will it work?”. Well, it tells you straight away, so you don’t have to sweat for long!

Use:
I hadn’t had a great deal of luck with the delivery or installation steps, so I was really hoping that now it was installed, it would be plain sailing. Sadly, this wasn’t the case. I was really keen to test the location services aspect of it, so I installed the app on my phone and fired it up. What I was expecting was for tado to show me at home and be heating the house to my “home” temperature. What I actually saw was tado showing me as away from home and allowing the house to cool down to my away temperature.

iPhone 5 010

I started checking my settings – tado had my correct address, so it knew where home was and location services on my phone were configured correctly for tado. Firing up Google Maps showed me at exactly the right location, so why did tado think I was away? I logged a support call with tado via email and while I waited for a response I played with various settings and scoured the internet for info, all to no avail. A week later and having still had no response from tado to my support ticket, I was getting a bit annoyed. I now had a heating system that I had to remember to manually turn on and off when I went to and came back from work. I gave up on the email support and called tado instead. I wish I’d done this sooner, as the guy on the phone was actually really helpful and quickly found the problem.

The tado app uses location services to determine whether you’re at home, or if not, how far away from home you are. It doesn’t need to be super accurate, so it tries not to use GPS, as that would harm battery life. Instead, it uses other location sources like phone masts to determine your approximate location. I live in a rural area and there is only one phone mast that can be picked up from my house, which is approximately 4km away. When I’m at home, as the tado app can only see one mast, it determines that as my location, which is far enough away from my house for tado to think I’m away. In order to rectify this, the guy I spoke to from tado support had to extend the range that tado considers “home” from 500m to around 5km. That fixed the initial problem of tado thinking I was away, as that distance incorporated the phone mast. Unfortunately, I work around 10km away from home and now when I’m at work, tado still thinks I’m at home and doesn’t turn down the heating. I asked if there’s any way to refine how tado determines that I’m at home, for example if it could detect my home WiFi network and use that to determine if I’m at home, that would be a good start. Apparently this works on Android, but Apple won’t let apps see that data on the iOS platform and of course I’m using an iPhone. They did say they’re working on a workaround for this issue on iOS and also that there are some app enhancements being worked on which will allow you to change your home location (though I’m not sure how this will be implemented) and to change the radius around your house that tado considers “home” (you currently need to call support to get this changed).

Summary:
At the moment, tado isn’t working very well for me and is a bit of a disappointment, but I’m hopeful that with their planned app enhancements it will soon work much more effectively. Also, I should point out that I’m an unusual case and it’s because I live in a rural area and work close to home that it’s not working for me. I’m sure if you lived in a more urban area, or somewhere with more mobile phone masts, Tado would work much more effectively. Overall, I think Tado shows a lot of promise, which makes it all the more frustrating that it’s just not working for me.

I’ll update this article as things develop.

Update – 12th March 2014:
Yesterday, an update for the tado iPhone app became available. The description in the app store was vague, just citing “bug fixes”, but I downloaded it. I noticed this morning that the tado web site had also recently been updated with a brand new (and in my opinion, much nicer) look & feel. The new web site also has some new functionality. I noticed that in the account settings, the pin in the map that shows the home location was in completely the wrong place, several miles away from my home (despite the written address & postcode above it being correct). With the new update, I discovered I can now drag and drop this pin, so I dragged it to where my house actually is and with eager anticipation opened the tado app on my iPhone to see if it had noticed I was away from home. It hadn’t. I opened Google maps to give location services a nudge and then went back into the tado app and, to my elation, it had noticed that I was away from home. Finally, tado seems to be doing what it says on the tin. It’s been next to useless for the last 5 months, but it now finally seems to do what I actually bought it for and I couldn’t be happier! Hopefully, it will continue to work as expected!

Update – 9th April 2014:
Last week, Nest finally launched a UK version of their thermostat. I don’t care. Since the tado app & website updates in the middle of March, my tado has been working like a dream and has made up for all the initial problems. Having used tado for a while now, I see it as far superior to the Nest thermostat, so I have no regrets buying a tado now that Nest is available in the UK.

I have a friend who has also recently purchased a tado and although he also had issues with his device being delayed and arriving a few weeks later than promised, he had non of the issues I had with the installation & use and he’s quite happy with it now it’s up & running. He’s also using tado to control hot water in his house and he’s reported limited functionality in the control of that aspect of it. He’s fed back to tado, who have said they intend to incorporate enhancements in hot water control in a future app update.

Leave a comment

Filed under Uncategorized

Mu Folding Plug

I travel a lot. I’m also a bit of a geek. This means that when I travel, my bag is usually full of an array of chargers for my various devices that I couldn’t possibly live without. I find UK mains plugs terribly cumbersome and a really awkward shape for travelling. Their pins stick out and get in the way, threatening to pierce my iPad’s screen, or something equally heinous.

Back in 2009, I came across a design concept that seemed like a stroke of genius – a folding three-pin plug that folds flat, leaving no pins sticking out. Thankfully, I wasn’t the only one that thought this was genius and some time later, they found funding to produce it and launched it as a real product called the Mu plug.

The website (www.themu.co.uk) has a nice animated graphic showing how it works, but when folded away, it looks like this:

iPhone5 390

It has a single USB port, which is perfect for charging most of my devices. One point to note though is that it only provides a one amp feed, so although it will charge an iPad, it won’t do it very quickly (the Apple charger for the iPad provides 2.1 amps).

iPhone5 391

When folded away, the pins are covered and it’s basically a small, white plastic square. This makes a perfect travel companion, as there are no pins sticking out to poke holes in anything, it’s very light weight and I can simply change the USB cable between Apple 30-pin, lightning, mini-USB, or whatever else I need to charge my iPad, iPhone, camera etc.

Here are a few pics of the Mu when unfolded:

iPhone5 392

iPhone5 393

iPhone5 394

I love my Mu and use it frequently, though it’s not perfect. It’s a UK plug, so only useful when travelling in the UK. This is fine, as when I’m abroad most countries use a two-pin type plug, which is much more travel friendly to begin with than a 3-pin UK plug. Also, the Mu is expensive, at £25 and there’s the issue with the low current meaning if you want to charge larger devices, like an iPad, you may want to take another higher-powered charger. Personally, I just use the Mu and leave it on charge over night.

Summary:

One of those designs that you can’t believe no-one thought of decades ago and an invaluable travel companion, though not without fault. Low current means charging power-hungry devices can be time consuming and they’re not cheap, at £25.

Leave a comment

Filed under Design, Gadgets

Eastern Collective USB to Lightning Cable

For a while now, I’ve been in need of an additional USB to lightning cable for my iPhone 5. I’ve got tons of the old 30-pin style cables at home, but only one of the lightning connector cables that came with my phone. I’ve been putting off buying one for a while, as the Apple ones seem expensive and with the authentication chip in the lightning connector, alternatives are limited. A couple of weeks ago, I happened across the Eastern Collective cables on coolhunting.com. I liked the individuality of their cables and although they’re expensive, they’re not much different to a standard Apple cable, cost-wise. I ordered one from easterncollective.com and it turned up the other day:

iPhone5 379

The company is based in the States and I couldn’t find a UK distributor. The Eastern Collective web shop will ship to the UK and with the current GBP/USD exchange rate, it wasn’t criminally expensive, so I took the plunge. The cable arrived within a week or so, which wasn’t bad considering it had come half-way across the world. Eastern Collective also do a range of other cables, including Apple 30-pin and mini USB in all sorts of patterns & colours. I chose a blue & yellow one:

iPhone5 388

The USB end of the cable has a nice Eastern Collective logo on it:

iPhone5 395

The lightning connector end is as you’d expect:

iPhone5 396

The quality of the cable and the connectors appears very good and the pattern looks ace, with vivid, bright colours. It’ll certainly stand out at home amongst the nest of white 30-pin cables and make it easier for me to pick the right cable for my iPhone 5.

UPDATE:

My Eastern Collective Lightning cable stopped working recently 😦 Since I upgraded to iOS v7, I’ve been getting warnings on my phone’s screen when I connect the cable saying that it’s not a certified cable. I was able to dismiss the warning and everything would work just fine. I recently updated to iOS v7.0.4 and it appears that Apple have updated the behavior of non-certified cables. Now, a non-certified cable won’t even charge the phone, making them redundant. My Eastern Collective cable sadly was not Made for iPhone (MFI) certified and so stopped working.

I looked into this and Eastern Collective said that their cables are now MFI certified, so I took the plunge and ordered another one. Sure enough, it works flawlessly with my iPhone 5 on iOS v7.0.4, with no errors or warnings. Happy days! The newer cables look slightly different to my old one pictured above – the white plastic housing around the lightning connector is a bit chunkier and the USB end no longer has the funky pattern, but is just plain white. The cable bit looks exactly the same as the old one however.

Leave a comment

Filed under Design, Gadgets